Start Here
This document is intended for developers who are integrating UKey Wallet hardware capabilities into web, desktop, or mobile applications. From here you can learn about SDK entry selection, device connection methods, initialization process, user interaction events, and how to initiate the first signature request.
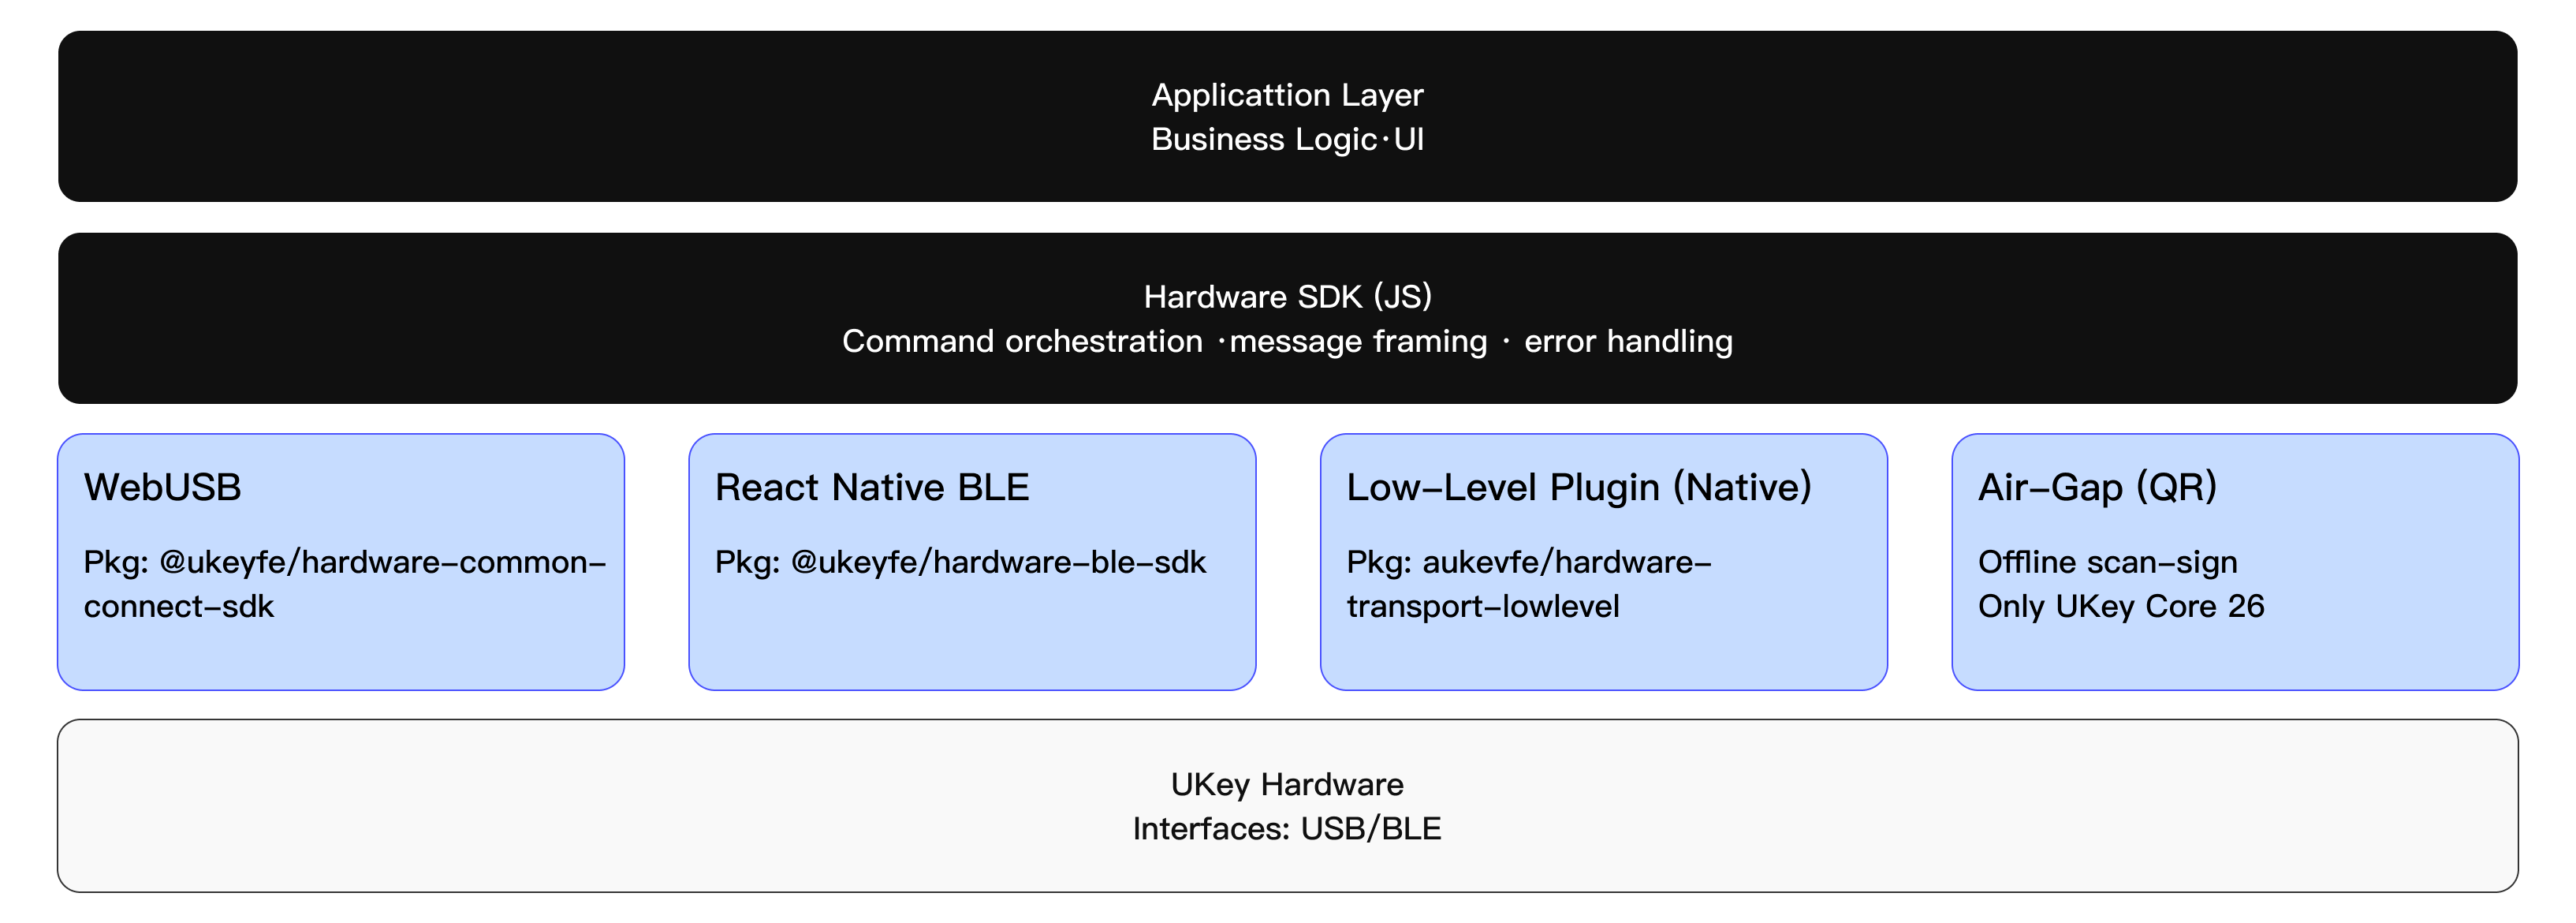
Pick Transport
First determine the transport layer based on the operating environment. For new USB/WebUSB integrations, start with @ukeyfe/hardware-common-connect-sdk; continue to use @ukeyfe/hardware-web-sdk only if the project still relies on the iframe plug-in host.
Link Modes
| Choice | details | Supported devices |
|---|---|---|
| USB / WebUSB | Connect the device via a USB cable; the browser uses WebUSB and native applications can forward data through the underlying plug-in | All UKey Wallet devices |
| Bluetooth BLE (Native) | Used for Bluetooth connection of native apps; does not rely on Web Bluetooth and requires system Bluetooth permissions | UKey Lite 24、UKey Lite 25、UKey Core 26 |
| Air-Gap (QR code) | Exchange data to be signed and signature results through QR codes, suitable for scenarios where online channels are not maintained | UKey Core 26 only |
Platform Map
| Platform stack | transport protocol | SDK package | Reference |
|---|---|---|---|
| Web (browser) | WebUSB | @ukeyfe/hardware-common-connect-sdk | WebUSB Connection Guide |
| React Native | Bluetooth | @ukeyfe/hardware-ble-sdk | React Native Bluetooth |
| Android (native) | Bluetooth | @ukeyfe/hardware-common-connect-sdk | Android Bluetooth |
| iOS (native) | Bluetooth | @ukeyfe/hardware-common-connect-sdk | iOS Bluetooth |
| Flutter | Bluetooth | @ukeyfe/hardware-common-connect-sdk | Flutter Bluetooth |
If you need to implement native channels yourself, please refer to: Underlying transport plug-ins and protocols
Add SDK
Install the corresponding SDK entry according to the target runtime to avoid mixing multiple sets of entries in the same scenario:
# Web/Desktop WebUSB entry (preferred)
npm i @ukeyfe/hardware-common-connect-sdk

# React Native BLE entry
npm i @ukeyfe/hardware-ble-sdk

# Native host + low-level plug-in bridge (Android/iOS/Flutter)
npm i @ukeyfe/hardware-common-connect-sdk

# Plug-in-side iframe package (plug-in environment only)
npm i @ukeyfe/hardware-web-sdk
Detailed access instructions for each transmission method:
- Please start the WebUSB project at WebUSB Guide.
- For React Native Bluetooth project, please refer to BLE Guide.
- Android, iOS, and Flutter native hosts usually have the native layer responsible for BLE, which is then exposed to JS through the underlying transmission plug-in.
- To customize hosts or special links, please implement Underlying transport plug-ins and protocols.
Start SDK
During initialization, the currently used transmission environment needs to be clarified. Unless you are migrating a compatibility layer, do not mix multiple SDK entries in a runtime.
Web/Desktop WebUSB
Use @ukeyfe/hardware-common-connect-sdk:
import ukeySdk from "@ukeyfe/hardware-common-connect-sdk";

await ukeySdk.init({
  env: "webusb",
  debug: process.env.NODE_ENV !== "production",
  fetchConfig: true,
});
React Native BLE entry
Use @ukeyfe/hardware-ble-sdk:
import ukeySdk from "@ukeyfe/hardware-ble-sdk";

await ukeySdk.init({
  debug: __DEV__,
});
Native bridging/lower layer protocols
Use @ukeyfe/hardware-common-connect-sdk:
import ukeySdk from "@ukeyfe/hardware-common-connect-sdk";

await ukeySdk.init({
  env: "lowlevel",
  debug: process.env.NODE_ENV !== "production",
  fetchConfig: true,
});
| environment | Use cases |
|---|---|
webusb | The browser accesses the device directly through WebUSB, no istack is required |
lowlevel | The native host implements the underlying adapter and then bridges the sending and receiving capabilities to JS |
react-native | BLE integration in React Native or Electron-like scenarios |
emulator | Use the simulator to complete development and debugging without relying on real devices |
Plug-in side Iframe
Using @ukeyfe/hardware-web-sdk (plug-in side only):
import HardwareWebSdk from "@ukeyfe/hardware-web-sdk";

const iframeSdk = HardwareWebSdk.HardwareWebSdk;

await iframeSdk.init({
  debug: process.env.NODE_ENV !== "production",
  connectSrc: "https://jssdk.demo.example/1.1.19/", // Note: iframe host
});
Hook Events
Before initiating a protected request, bind the event listener first. Interactions such as device plugging and unplugging, PIN, Passphrase, and confirmation pop-ups will notify the application through the event channel.
import { UI_EVENT, UI_REQUEST, DEVICE } from "@ukeyfe/hardware-core";

ukeySdk.on(UI_EVENT, async (message) => {
  switch (message.type) {
    case UI_REQUEST.REQUEST_PIN:
      // Handle the PIN entry flow below
      break;
    case UI_REQUEST.REQUEST_PASSPHRASE:
      // Handle the passphrase flow below
      break;
  }
});

ukeySdk.on(DEVICE.CONNECT, (payload) => console.log("Connection event:", payload));
ukeySdk.on(DEVICE.DISCONNECT, (payload) => console.log("Disconnect details:", payload));
Find Devices
Ask For USB Access
import { UKEY_WEBUSB_FILTER } from "@ukeyfe/hardware-shared";

// Show the browser's USB chooser from a click or another deliberate user action.
await navigator.usb.requestDevice({ filters: UKEY_WEBUSB_FILTER });
Find device
const callResult = await ukeySdk.searchDevices();
if (!callResult.success) throw new Error(callResult.payload.error);

const availableDevices = callResult.payload;
// Example array: [{ connectId, deviceId?, name, deviceType, ... }]
Read device
Call getFeatures when you need the latest device_id required for device identity, firmware information, or BLE calls:
const featureInfo = await ukeySdk.getFeatures(connectId);
if (!featureInfo.success) throw new Error(featureInfo.payload.error);

const deviceId = featureInfo.payload.device_id;
**Important: **
connectIdrepresents the connection channel, which can usually be saved for a long time;device_idrepresents the current device identity, which may change after the device is reset or restored and needs to be reacquired throughgetFeatures.
PIN Input
When the device is locked and the request needs authorization, the SDK emits REQUEST_PIN. The safer pattern is to keep PIN entry on the hardware so the host app never receives the PIN.
import { UI_RESPONSE } from "@ukeyfe/hardware-core";

// Path A: keep PIN entry on the device screen (recommended first)
await ukeySdk.uiResponse({
  type: UI_RESPONSE.RECEIVE_PIN,
  payload: "@@UKEY_INPUT_PIN_IN_DEVICE",
});

// Path B: enter the blind PIN in software (UKey Core 26 only supports device-side entry)
await ukeySdk.uiResponse({
  type: UI_RESPONSE.RECEIVE_PIN,
  payload: userInputPin, // Reference input: '1234'
});
Note: UKey Core 26 completes PIN entry only on the hardware; UKey Lite 24 and UKey Lite 25 also support software-side blind input.
Use Passphrase
Passphrase is used to select a standard wallet or a hidden wallet under the same set of mnemonic phrases. Applications can allow user input on the device, or they can be collected in the software interface and processed according to session caching policies.
// Path A: let the device handle the Passphrase input directly (safest)
await ukeySdk.uiResponse({
  type: UI_RESPONSE.RECEIVE_PASSPHRASE,
  payload: { passphraseOnDevice: true, value: "" },
});

// Path B: collect it in software, with optional session caching
await ukeySdk.uiResponse({
  type: UI_RESPONSE.RECEIVE_PASSPHRASE,
  payload: { value: userPassphrase, passphraseOnDevice: false, save: true },
});
If a standard wallet must be used for a certain request, please pass useEmptyPassphrase: true in the method inputs to skip the hidden wallet selection.
First Sign
The following example demonstrates how to initiate an EIP-191 style EVM message signing:
const message = "Sample EVM message for signing";
const messageHex = Buffer.from(message).toString("hex");

const opResult = await ukeySdk.evmSignMessage(connectId, deviceId, {
  path: "m/44'/60'/5'",
  messageHex,
  chainId: 1,
});

if (!opResult.success) throw new Error(opResult.payload.error);

console.log("Address result:", opResult.payload.address);
console.log("Signature result:", opResult.payload.signature);
Support Matrix
The following matrix is used to quickly determine which connection methods are supported by different models:
| equipment | Bluetooth | USB | Air-Gap |
|---|---|---|---|
UKey Lite 24 UKey Lite 24 | Supported | Supported | N/A |
UKey Lite 25 UKey Lite 25 | Supported | Supported | N/A |
UKey Core 26 UKey Core 26 | Supported | Supported | Supported |
Air-Gap Mode: UKey Core 26 can complete offline signatures by exchanging data through QR codes without the need to maintain a USB or Bluetooth connection. See Air-Gap integration for details.
Core Kits
| package name | use | NPM |
|---|---|---|
@ukeyfe/hardware-common-connect-sdk | Unified SDK entrance for WebUSB and native bridging scenarios, the first choice for most integrations | npm |
@ukeyfe/hardware-ble-sdk | BLE connection and communication capabilities used by React Native projects | npm |
@ukeyfe/hardware-transport-react-native | React Native transport layer bridging and side effect processing | npm |
@ukeyfe/hd-transport-web-device | Transport mode layer implementation for accessing hardware devices in a web environment | npm |
@ukeyfe/hd-transport-emulator | Simulator transport layer, suitable for device-less development and automated debugging | npm |
@ukeyfe/hd-transport-http | Transport mode layer for bridging hardware communications over HTTP | npm |
@ukeyfe/hd-transport-lowlevel | The underlying adapter contract that needs to be implemented by customizing the native host | npm |
@ukeyfe/hardware-core | Core definitions of SDK events, constants and message flow | npm |
@ukeyfe/hardware-shared | Variant list, filters, and tool actions shared across SDKs | npm |
- Request method for each chain: API reference
- UI events and app responses: event reference
- PIN entry and unlocking process: PIN code
- Hidden wallet with Passphrase: passphrase
Concepts and Advanced Topics
- If you need to debug the underlying transmission, troubleshoot message sending and receiving issues, or access a custom host channel, you can continue reading: Underlying transport plug-ins and protocols
support
This document mainly serves development integration. If you encounter product usage issues, please check the Help Center first; if it is an SDK integration issue, you can discuss or submit an issue in GitHub.